
Having wires or audio cables visible can be annoying and can make the room look messier. Fortunately, there are a few tricks to hide your speaker wires or audio cables.
Some of the tricks to hide speaker wires or audio cables include hiding them in your carpet, behind the baseboards, under the floor, or in drywall. You can also buy external tools such as cable runners, cable holders, or ghost wires that will hide your wires.
If you have any sort of electronics in your living room or any other space in the house, you definitely have wires or audio cables lying around. Extra cables near the floors or hanging down the walls can lower your area's aesthetic and create a tripping hazard. Wires can also be annoying while vacuuming; this article will discuss how to hide your speaker wires or audio cables to create a clean and tidy area.
Table of Contents
Where to Hide Your Speaker Wires or Audio Cables
One of the most common tricks to dealing with wires is to hide them in certain areas such as carpets, baseboards, hardwood floors, doorways, or drywall. Some are easier than others, so let's dive in to find a solution suitable for you.
Carpet
If you have wires that you want to hide in a carpeted room, then, fortunately, you already have everything you will need. All you have to do is tuck the wire between your carpet and baseboards. When you have your wire in hand, begin to tuck the wire between the baseboard and carpet while pushing the carpet down a bit.
One thing to note is to make sure you know where the wire is going before you start doing this, so you will know for sure you have enough wire for the carpet's length. Once you're done, the wire should be completely hidden.
Baseboards
Before you begin this option, keep in mind that this is a more advanced trick and requires a bit more skill than others. With that being said, let's look at the steps.
- The first thing you have to do is break the top paint seal between the baseboard and the wall. You can do this by taking a utility knife or razor and running it along the seal.
- The next thing you need to do is remove the base moldings from where you plan to run your wire. Start at the first stud, and carefully shake/move the molding until you can fully remove it. Make sure to be careful at this stage to avoid any cracking or blemishing of the molding. Continue this process at each stud until you have every molding removed that needs to be.
- This step is mostly housekeeping for a later step. Eventually, you will have to put the moldings back on the wall in the same place as you removed them. Store the boards in a safe place and remember what order you removed them in. You can either number the boards themselves or place sticky notes on each board with a number.
- There are two options for this stage. The first option is to hide the wires in between the baseboard and your flooring. Usually, on hardwood flooring, there is a small space between the floor and the wall. You can simply put the wire in this space. The second option would be to create a channel behind the molding in the wall. You can also purchase moldings that have channels already built into them.
- Run the wire, making sure to avoid any snagging.
- The last step is to reinstall the baseboards to the wall. Make sure to follow the numbering system you put in place before. Installing the boards back in order will ensure a perfect fit.
Hardwood Floors
There are several ways to hide wires with your hardwood floors. Hiding your cables with the floor is mostly done with other tools, the most popular gadget being raceways or runners. We will discuss what exactly those are later, but keep in mind that you can get wire runners that are wood colored to match your hardwood floors.
If you want to use your hardwood floors to hide wires, you will have to purchase additional tools, which we will discuss later. Many of them are easy to use and will blend in well with your hardwood, while some of them (such as ghost wires) can be hidden beneath the floorboards. As the article mentioned earlier, you can also hide the cables in the small space between the floor and baseboards.
Doorways
There are a few things you can do with a doorway. If you have wires that simply cross in front of a doorway or are going through to another room, you can use wire covers/runners to hide the wires.
However, there is also another option with doorways. You can also run wires around your doorway, hiding them behind the door frame. There will be a few steps for this. Keep in mind that this will be a trickier process as well (similar to the process of hiding wires behind baseboards).
- Remove the trim or molding that is at the top of the door. You will have to remove the nails as well.
- Drill a small hole (just big enough for your wire to fit) just behind the trim. You can use a drywall saw for this.
- There should be a hole near the top of the door frame that is inside the wall. Find this hole and feed a heavy string or chain through it, feeding it behind the wall to the open baseboard below at the bottom of the door.
- You can then use this chain or heavy string to feed the wire through the door frame and back down to the other side.
- Use a wire runner or raceway to secure the wire behind the baseboard.
- Reinstall all of the trim or baseboard you removed earlier, making sure to put it back exactly where you removed it.
Drywall
This option will probably be the hardest solution on the list, but it will have great results. When you hide your wires behind the wall, there will be no trace of them at all.
Here is a list of what materials you will need:
- Drywall jab saw
- Screwdriver
- Two low voltage wall electrical boxes (single gang)
- Two cable access brush plates (single gang)
Now that you have everything you need, let's look at all of the steps.
- The first step is to trace and cut the holes where your electrical boxes will go. The first box should be behind the television (not in the way of the television mount). Trace the box with a pencil, and then cut the hole on the inside of the line. Use the measurements 1/8-3/16 to do this. Cutting the hole smaller than the trace line will ensure the box fits snuggly and won't fall out.
- The next thing you will do is to screw in the electrical box and feed the wires through. Since low voltage electrical boxes are almost completely open, it will be fairly easy to feed the wires through. Make sure to do this before you put on the brush plate.
- Install the brush plate. Feed the wires through the brush plate and use your screwdriver to install it. After this, add the plate cover.
Since this is a more complicated process, it might help to read the instructions alongside a visual example. Check out the youtube video below for a more elaborate description of how to hide your wires in drywall. You can also hire an electrician to do this:

Tools for Hiding Your Wires or Cables
Now that we have gone over different features in your house that you can utilize to hide wires and cables, let's look at a few options you can buy that will be pretty simple to use.
Flat Wires
Instead of covering your round wires, you can buy flat wires created so thin that they can easily appear invisible to the eye. All you need to do is tape them to the wall or glue them, and then paint them with the same color as your wall, or cover them with a concealing material.
A few companies offer these products, such as Southwire, Worldwide Cable, and Taperwire. Cables that are available in flat wires include (but are not restricted to) audio, video, low-voltage and data wires, and HDMI cords.
Each flat wire is different and has either one, two, or three very thin copper wires encased in a film. The reason why these wires work is that copper is a conductor. Electricity can freely flow through the wires because of its atomic structure.
Even though it is possible to create one flat wire with different functions, many companies stick to making one wire for one function to lower the possibility of injuries or damage to your equipment.
The only downside of flat wires is that you cannot simply plug them into your devices. The installation will differ for each cord, but there will be instructions that come with each cord. The process is quick and pretty simple. The wires usually come with adapters or custom connectors and require you to peel back the film and expose the copper wires to trim them to the length you need.
Here are the materials you will need to install the flat wires:
- Marker/pencil
- Spray adhesive
- A screwdriver or an electric drill
- Plastic squeegee
- Scissors
- Sandpaper
- Paint
- Mesh tape
- Concealing compound
Now that you have everything you need, let's take a look at how to install flat wires.
- Use the marker or pencil to draw your flat wire route from the power source to your device. A great feature about flat wires is that you can fold it 90 degrees on the wall, so even if you can't make a straight connection line, you won't have to worry. However, try to fold it as little as possible.
- If you are installing speaker wires, use the spray adhesive to glue the wire to the wall. Then you can use the squeegee to smooth out any bubbles or bumps that may have appeared. After you have removed the bubbles, trim the wire to however long you need it, and plug it into your device.
- If you are installing video or data wire, install the wall boxes first with the screwdriver and then test the wire. Follow the instructions for the custom connector and align the connector with the wire. After you have secured the connector with a clamp, trim the wire to the length you need.
- You can now use the spray adhesive to glue the video or data wire to the wall, following your premarked trail.
- To hide the wire, you can cover the wire first with the mesh tape. Then apply the concealing compound over the wire. Once this has dried, use the sandpaper to smooth it out. Finally, paint over the concealing compound in the same color as your wall. Now you have an invisible wire!
Ghost Wires
A company called Sewell Direct offers a new kind of wire, similar to flat wires. It is called a ghost wire, and it is a super flat speaker wire that is adhesive. The product looks like a wide, thin piece of tape that easily sticks to the wall. It is normally white, but you can easily paint over the wire to make it disappear.
You can use this wire in rooms and cars. You can attach the ghost wire to the wall, but you can also hide this under flooring since it is so thin. You only need a pair of scissors, a razor or a knife, and a screwdriver to install these wires. If you are interested in buying ghost wires, check out the Ghost Wire 2.0 Super Flat Adhesive Speaker Wire from Amazon.
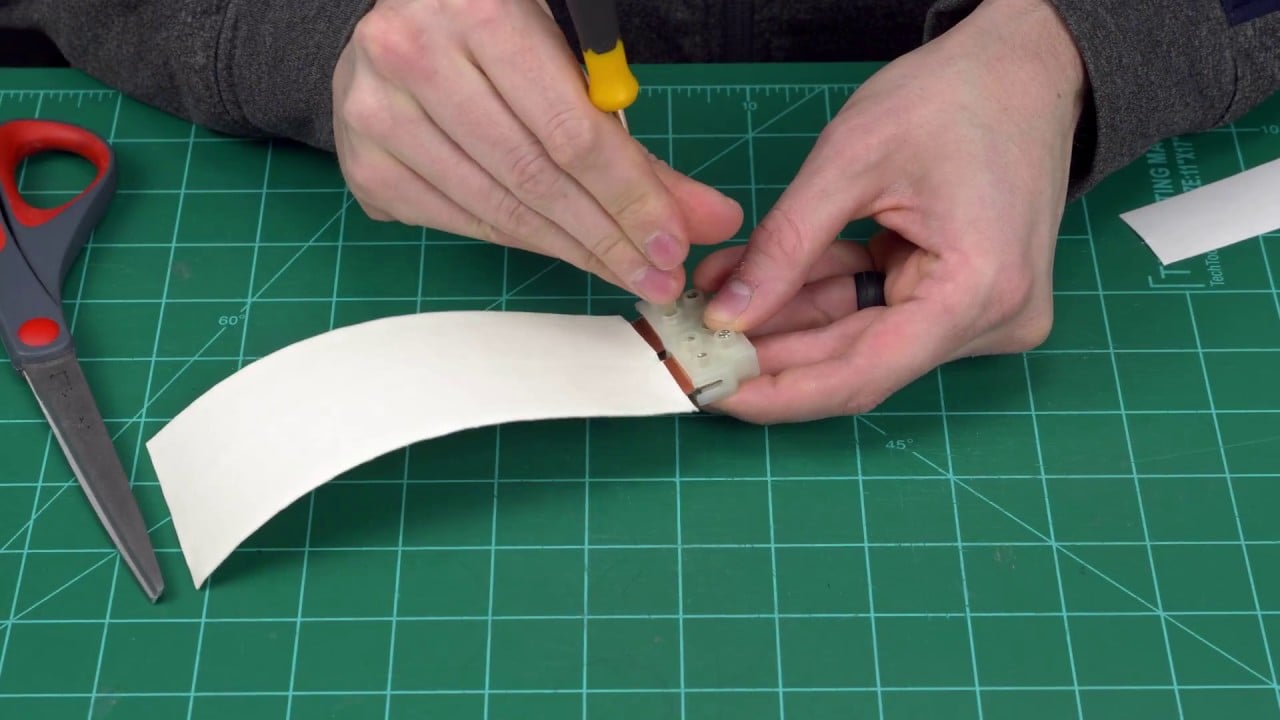
To install the ghost wire, you will have to connect the conductors into the terminal block that later attaches to the wall. Let's take a look at how to do this.
- Peel back the white adhesive about one inch (2.5 cm). The copper conductors and white adhesive are exposed now.
- Next, you will use your razor to cut around the copper conductor and cut away the white adhesive surrounding it.
- Turn the wire around, and remove the non-adhesive white material on the other side of the copper.
- Fold the exposed copper conductors about three to four times.
- You can now insert the conductors into the terminal block. Make sure to tighten the screws.
- Insert your speaker cable into the terminal block.
Since these steps can be a bit confusing, check out the video below for a visual example:
Runners
Runners, or raceways, are tracks that hide cables. They are channels that the wires run through, and the channels are usually plastic or metal. There are a few different kinds of runners, including indoor, outdoor, and industrial runners.
The great thing about runners is that they come in a variety of colors and patterns. You can easily get wood grain patterns or a variety of solid colors. Runners are great if you want something that is easy to install and requires little to no customization.
Cable Holders
If you are looking for something that requires no installation, then cable holders will be the way to go. Cable holders are clips that you can put on your desk or television stand. You simply place the cables in the holders, and it keeps the wires steady and neatly organized.
Cable holders will not be a great solution if you have over five cords since many cable holder devices have five slots, but you can always order individual holders for more cords. Something to keep in mind about this solution is that they do not hide the cords and wires; they simply organize them. With that said, this option will be the easiest trick to use.
Guide Systems
Guide systems are similar to cable holders in the sense that they do not hide cords. They are exterior tools (such as cable clamps) that you use to guide the cables or wires by creating a trail on the wall and/or the floor.
The cable guide systems are great for those who have many thick wires that will be hard to hide using the other tricks listed. Guide systems will not create a wire-free space, but they will clean up the mess of tangled wires on your floor.
Conclusion
There are several reasons why you should think about cleaning up your cords and wires. First of all, they can create tripping hazards for your family. They also lower the aesthetic of your room and can be irritating while vacuuming.
There are two general ways to hide your cords. The first option is to use what you already have. You can hide your wires in the carpet or in your baseboards, to name a few. The second option is to buy tools such as cable holders, runners, or flat wires and ghost wires.