With the constant improvements being made to the picture quality of TVs, from HD to Ultra-HD and now 4K and beyond, watching a movie or TV show at home has become a lot more like a cinema experience. But similar improvements have not been made to the native speakers that come with your television. So while you may have a crystal clear image, you more than likely will have to connect your TV to a surround sound system to get the same quality audio.
To connect your TV to a home theater receiver, use an HDMI cable, an RCA cable, a digital optical cable, and an HDMI-ARC cable. You can also use wireless technology like Bluetooth or add a wireless adapter to your TV. The method you use will depend on the models of your TV and home theater receiver.
In this article, we will go over what a home theater receiver is and what it does, why you would want to use a home theater receiver to connect your TV to an audio system, as well as going over a shortlist of sample home theater receivers you might want to choose.
Table of Contents
What Is a Home Theater Receiver?
A home theater receiver, which is also known as a surround-sound receiver or an audiovisual or video (AV) receiver, is made to be a central control hub for various audio and visual devices that are connected to it. This includes a TV, DVD or Blu-ray player, other set-top boxes, surround sound speaker system, or an external display device, like a projector.
This is different from a stereo receiver, which is made for audio-only devices and is designed to play music. It has the ability to connect to video devices, but the results are not as good as they are with a home theater receiver.
On the other hand, a home theater receiver has at least 5 built-in amps and a preamp output for a subwoofer, meaning you will be able to connect a surround sound speaker system to it, as it also has surround sound decoding capabilities. Home theater receivers have various input options for connecting through analog, digital optical, coaxial, or HDMI inputs, making it specifically geared towards a home theater setup.
What Does a Home Theater Receiver Do?
Now that you know what a home theater receiver is, let us take a quick look at what it does.
- Links and switches between video inputs: Video or image inputs like DVD players, Blu-ray players, and gaming consoles are connected directly to your receiver. The receiver is connected to a display like a TV or a projector. This allows you to quickly switch between image inputs and display them on the same display device without having to connect them all to the display individually. Unless you have an HDMI switcher, you most likely won't have enough inputs on your TV to hook up everything.
- Links and switches between audio inputs: All of the different audio inputs you use can be connected to the receiver. It can easily be switched between when you want to change which audio input you want to listen from, all while being played through your surround sound speaker system. It gives you a great audio-only experience as well as great audio with any video you watch.
- Can decode surround sound formats: Most home theater receivers manufactured nowadays are able to decode both analog and digital surround sound formats, like the DTS Master Audio or Dolby Digital TrueHD formats that are found on most Blu-ray discs and some DVDs now, something a stereo receiver can not do.
- Includes a radio tuner: home theater receivers would not be what they are if they did not include a radio tuner. Some of them even have satellite radio receivers for listening to things like Sirius or XM radio stations.
- Powers multiple speakers with amplified audio signals: Another thing that makes a home theater receiver different from a stereo receiver is the fact that it has, at minimum, five built-in amplification channels that power the surround sound speakers.
- Connects and acts as an interface for your home theater system: Your receiver will most likely come with a remote controller and a display on the face of the receiver. Sometimes it can even display on your TV, allowing you to control all of the connected home theater devices from one central hub.
As you can see, home theater receivers do a lot of things that will automatically make your home theater system work more efficiently and make your home viewing experience more enjoyable. Now let us talk about why you would want to have a home theater receiver at all.
Why Would You Want or Need to Connect a TV to a Home Theater Receiver?
Since all televisions can produce sound straight out of the box, many people may be wondering why they would want or need to connect their television to a home theater system in the first place.
The answer is quite simple; you do not need to connect it to a home theater system, but you will get a much better sound if you do. TVs these days are designed to be as sleek as possible, which makes them look very good, but leaves very little room for speakers to be installed into their body.
Speakers need to have enough space to move the air out of the TV's body and create a good sound, but as the width of the TV's bodies decreases, so does the space available for speakers to work and often makes their sound coming out sounding flat and unvarying.
Connecting your TV to your home theater receiver will also allow you to easily switch between various video and image input devices that you have connected to your receiver, like a DVD or Blu-ray player or a gaming console.
Thus connecting your TV to a home theater speaker system through a receiver will give you much better sound and overall a better and more efficient entertainment experience. There are five different ways you can do this for audio and one way to connect it for video, and we will go over each of those individually step-by-step below.
Of course, the method that you use will depend on the type of TV and the type of home theater receiver you have.
Connecting to a Home Theater Receiver for Video
Since there is only one way to connect your TV to your home theater receiver to get visuals from the other devices connected to your receiver to show on your TV, we will go over this one first and then move on to audio.
Yes, there is technically another way with DisplayPort (DP), but that isn't widely used for home theater unless you use an HTPC with specific motherboard output.
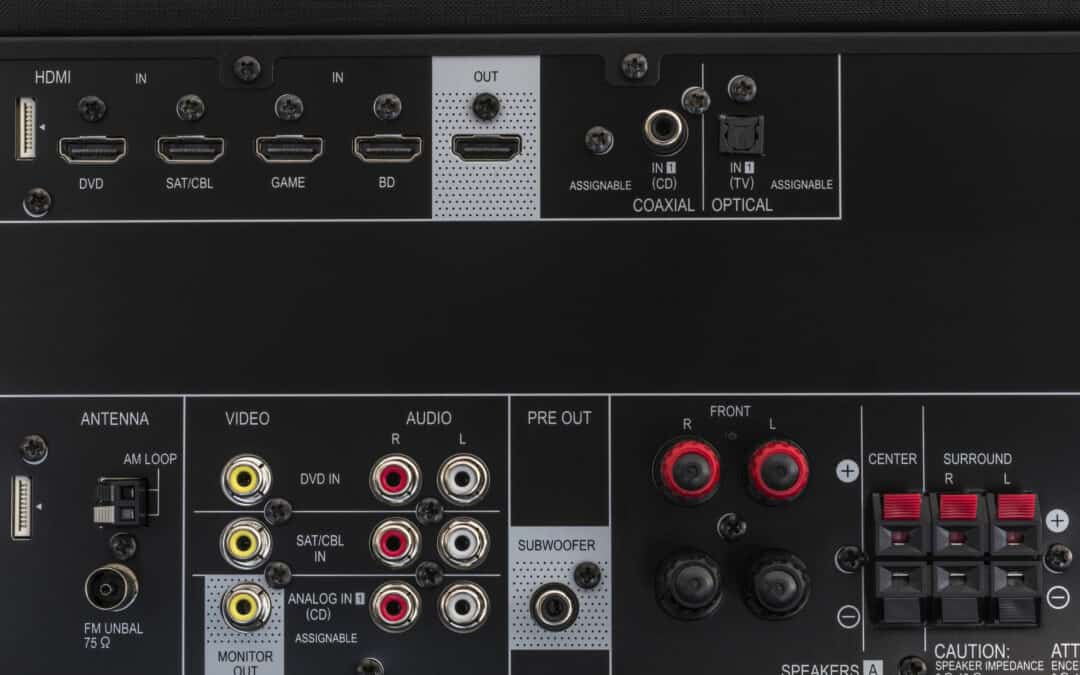
Use an HDMI Cable
A High-Definition Multimedia Interface (HDMI) cable will allow you to transfer uncompressed video data from the devices connected to your home theater receiver to your TV. It is also the cable that you would use to connect any other external device, like a laptop to your TV. It is also a durable and reliable cable and very simple to use.
How to Connect Using an HDMI Cable
To do this, follow these steps:
- Connect one side of the HDMI cable to your HDMI input port on your TV.
- Connect the other side of the cable to the HDMI output port of the home theater receiver, and you can start watching videos from the devices connected to your receiver on your TV, all without sound, however.
This distinction is usually a non-issue for modern HDMI connections and cables (post 1.4). HDMI-ARC is discussed in the audio section below.
Connecting to a Home Theater Receiver for Audio
Now let us go over the five additional options to connecting your TV to your receiver for audio purposes.
Use the TV’s RCA Output
The easiest and most elemental way to connect your TV to an external audio device, like a home theater receiver, is by using RCA, AKA composite, cables to connect the receiver to the TV's stereo outputs (RCA outputs). This should work with most TVs you may already own as many were manufactured with these outputs.
However, if you are buying a very new and recently manufactured TV, this option might not work for you. Most TV manufacturers are no longer adding RCA analog outputs to their TVs anymore. So be sure to check that your TV has an RCA output before trying this method.
How to Connect Using RCA Cables
To do this, follow these steps:
- Connect the RCA cables to the audio output of the TV. The cables should have colors that correspond with the colors of the output ports of the TV. They are usually red, white, and yellow. Mono versions include red and white, yellow and white, or red and yellow.
- Connect the other sides of the RCA cables to the audio input ports of the home theater receiver. Be sure to use the same color ports as those you used on the TV unless the receiver states that the colors are different. Connect the color cable that is the same as its corresponding port and the cable with a different color to the other port.
- Switch the home theater receiver on and follow the instructions presented on your TV screen. As soon as you switch your receiver on, instructions on how to change your TV's audio output settings should appear on the screen. If nothing happens, you can just go into your TV's audio settings and change the audio output mode manually.
- Select the RCA audio input option on your home theater receiver to play sound through your home theater speaker system. If you can not hear any sound, make sure you connected the cables correctly or chose the right input and output modes on your receiver and TV, respectively.
This connection type only provides stereo sound, the lowest quality in modern home theater systems. Only aging systems will have to worry about RF or lower.
Use a Digital Optical Output Connection
Using your TV's digital optical output connection to connect your TV to your home theater receiver is probably a better option than using the RCA output. It may be able to supply a two or 5.1 channel coded audio signal in addition to a two-channel stereo signal, as opposed to only the two-channel stereo signal that you will get from RCA cables. This will give you a better and richer sound quality than the RCA connection option.
How to Connect Using a Digital Optical Cable
To do this, follow these steps:
- Connect a digital optical cable to the corresponding output on the back of your TV. If the output has a small cover on it, you will need to remove that before you can put the cable into the output. Remember to put the cover in a safe place so you can replace it if you ever disconnect the digital optical cable from the TV in the future.
- Connect the opposite end of the cable to the digital optical input port of your home theater receiver. Again, you may need to remove the cover before you can access the port.
- After connecting the cable to both the TV and the home theater receiver, switch the home theater receiver on and follow the setup instructions of your audio system. When you switch your receiver on, instructions on how to change your TV's audio output settings should appear on the screen. If nothing happens, you can just go into your TV's audio settings and change the audio output mode manually.
- Choose the digital optical input option on your home theater receiver so that it will produce sound. If you can not hear any sound, make sure you connected the cables correctly or chose the right input and output modes on your receiver and TV, respectively.
- If you still do not hear anything, check whether your TV has an option called PCM (pulse code modulation). This will decode a Dolby or DTS sound signal before it is sent to the receiver, as some receivers do not have the capability to decode the signals themselves.
Optical cables, AKA SPDIF, sound good, but may introduce audio delay to your picture, especially in older systems. There is usually an option to delay audio to sync to video output if this is the case.
Use Your TV’s HDMI-ARC Output
Using an HDMI-ARC (High-Definition Multimedia Interface-Audio Return Channel) output is probably one of the most hassle-free ways to connect your TV to your home theater receiver. It will transfer both your audio and video signals in one. However, you need to have a TV and receiver with an HDMI-ARC output to be able to use this method. A regular HDMI output will not work for this.
Using an HDMI-ARC connection will let you connect your TV to your receiver for both video and audio purposes with a single cable. This means you do not have to invest in an extra RCA or digital optical cable, and it will keep the cable situation behind your TV less cluttered.
However, it is very important that both your TV and home theater receiver are compatible with an ARC cable. You can check this by looking at where the HDMI ports on these devices are. If there is ARC written next to the HDMI port then your device is ARC-compatible, but if not, then you will not be able to use this method.
How to Connect Using an HDMI-ARC Cable
To do this, follow these steps:
- Connect your HDMI-ARC cable to the HDMI port of your TV.
- Connect the other end of the cable to your home theater receiver.
- Bob's your uncle! As soon as you change your video input mode to the HDMI or HDMI-ARC option, any sound should also be transferred through the HDMI-ARC cable from your TV to your home theater receiver.
Use a Bluetooth Connection
If the sound system you are using has Bluetooth capabilities, this may be the option you want to use. As more and more smart TVs are being manufactured, they are starting to include Bluetooth connectivity capabilities in most newer models.
However, in some cases, your brand of TV is only compatible with audio systems or home theater receivers from the same brand. For example, if you have a Samsung TV, you will need a Samsung receiver or audio player, and the same goes for other brands of TVs. Using a Bluetooth connection can sometimes lead to issues with syncing, and the audio might begin to lag a bit behind the video on your TV.
Nonetheless, if you do not want a lot of cables lying around on your floor, you may want to go with this method. The menu layout of different TV models will vary, but once you have found your wireless connections or audio output selection sections, there are similar steps you will need to follow.
How to Connect Using Bluetooth
To do this, follow these steps:
- Switch your Bluetooth-compatible TV and audio system on.
- In your TV's wireless connection or audio setup section of the menu and click on the Bluetooth option to get your TV and audio system to pair.
- Wait for verification that your TV and audio system have paired. This may be a short beep sound being played through the speaker or a message might pop up on your TV screen.
You can also use other Bluetooth speakers with this method.
Use a Wireless Connection
As we move further into a world where soon almost everything could be wireless, television companies are finding ways to integrate their products into the wireless space too. One of the ways they are doing this is by making their TVs compatible with wireless transmitters that allow users to play the sound from their TVs through wireless speakers and sound systems.
LG has partnered with WiSA (Wireless Speaker and Audio Association) and has built new firmware into some of their newer TV models that allow them to communicate with a WiSA USB dongle that plugs into the TV. The dongle allows it to send sound to an external speaker or audio system with a wireless signal.
Once the dongle is plugged in and the audio system or speaker is turned on, users can go to the audio setup section and select the WiSA Speakers option under the sound out tab.
Roku has also jumped on this bandwagon and will allow you to play sound wirelessly through their line of wireless speakers.
As you can see, there are a myriad of ways to connect your TV to your home theater receiver, so now let us go over a few recommendations of good home theater receivers you could look into getting if you do not already own one.
Sample Home Theater Receivers to Choose From
Here's a quick list of sample home theater receivers you could use to connect your TV to:
Denon AVC-X3700H
The Denon AVC-X3700H is a great home theater receiver at a great price. It provides great dynamic sound with wonderful clarity that will help you feel fully immersed in whatever you are watching, especially if you pair it with a great set of surround sound speakers.
This receiver supports up to an 8K and HDR video input and can decode Dolby Atmos, DTS:X, and IMAX Enhanced sound signals. It has 9.2 audio channels, 7 HDMI inputs, and Bluetooth capabilities as well.
Sony STR-DN1080
The Sony STR-DN1080 has won product of the year for two years now, and that should pretty much tell you all you need to know about this home theater receiver. It comes with a remote controller, which unfortunately is not backlit, provides great value for money. It produces a deeply dynamic sound while still keeping the detail and integrity of each sound intact.
It supports 4K and HDR video inputs and has Dolby Atmos and DTS:X decoding capabilities. It also features 7.2 audio channels, 6 HDMI inputs, and Bluetooth connection capabilities.
Marantz SR5014
The Marantz SR5014 is another great choice in terms of capable home theater receivers. It provides a powerful and full-bodied sound that is not too sharp and is rather easy on the ear. It also has pretty much any type of connection you will ever need to connect anything to this receiver, so you will not need to compromise with any of your external devices.
This receiver provides support for 4K and HDR video inputs and is able to decode Dolby Atmos and DTS:X sound formats. It comes equipped with 7.2 audio channels, 8 HDMI input ports, and Bluetooth and Wi-Fi connectivity options. All in all, this is a great machine with connection options to satisfy any person and their device needs.
Denon AVR-X4500H
The Denon AVR-X4500H is a relatively newer model but still comes at a great price point. It provides powerful sound, especially on the low end, which some other receivers are not capable of doing. However, it does not jumble any sounds and keeps them clean and well-balanced, with a great dynamic expression.
This powerhouse home theater receiver supports 4K, and HDR video inputs can decode Dolby Atmos, DTS:X, and DTS Virtual:X surround sound formats. It also comes equipped with 7.2 audio channels, 8 HDMI inputs, and 3 HDMI outputs and has smart features that make it capable of connecting to Siri, Alexa, and Google Assistant.
Other Things to Note
Now that we have gone over all of the ways you can connect your TV to a home theater receiver and a shortlist of home theater receivers you might want to look into getting if you do not already own one, let us go over a few last things relating to home theater receivers.
You need to connect your TV to your home theater receiver so that audio signals that have to pass through the TV, like those from streamed content or over-the-air broadcasted content. This ensures that the sound can be played through your audio system, which will produce significantly better sound than your TV's speakers.
Remember to check the connections between your home theater receiver and any external devices you have connected to it, like a DVD or Blu-ray player, set-top boxes, game console, and surround sound speaker system, regularly.
This ensures that none of the cables have come loose or have fallen out. It will also give you a chance to make sure that the cables and ports are clean, as dirt in the connection can have an impact on the quality of what you see and hear.
It is also important to keep your home theater receiver and other devices like disc players and game consoles in a well-ventilated place to make sure they do not overheat and damage any of the parts inside of them. This will ensure that they keep working at their best capacity for the longest possible time before you will need to replace them.
If you have problems or are not comfortable connecting your home theater receiver to any external devices, call a professional to help you set your home theater system up. This way, you will ensure your own safety, and you will be sure that your home theater system will work properly.
Conclusion
Connecting your TV to a home theater receiver will make managing different entertainment devices easier and ensure that you do not need to suffer watching your favorite TV show or movie with bad sound. There are many ways to connect your TV to your home theater receiver, so you are sure to find what works for you.
Here is a rundown of ways you can connect your TV to your home theater receiver:
- Using an RCA cable
- Using a digital optical cable
- Using a regular HDMI cable
- Using an HDMI-ARC cable
- Using a Bluetooth connection
- Using a wireless connection or adapter