There are many ways to connect a laptop or PC to an AV receiver, depending on the type of audio equipment you have and the system setup. When determining the best way to connect the two, you should consider several factors, such as whether the receiver has an onboard DAC (Digital Analog Converter) or whether you will need to use a standalone DAC.
To connect any laptop or PC to an AV receiver, you can use an analog cable, which is the most common way. You can also use an HDMI cable, USB, coaxial jack, Toslink cable, or ethernet cable. Alternatively, using your TV as a PC monitor or a phantom monitor could also work.
If you have different options to choose from, you may have a challenging time settling for one. This article provides details of how to go about connecting your laptop to the AV receiver. It also highlights how you can connect surround sound and stereo in one receiver, how to make a wireless connection, and some of the mistakes you should avoid when setting up your home theater system.
Table of Contents
Understanding the AV Receiver
An AV receiver is an electronics component usually found in home theaters and plays several roles. It is responsible for connecting and switching the audio devices in the home theater system setup and the video sources.
The receiver also amplifies the sound to be heard by the speakers and provides the user interface for your home theater. Other functions include decoding the format of surrounding sounds and tuning in radio programming.
Depending on your electronics model, you may have an easier time connecting your AV receiver to a PC than to a laptop.
Most people have a challenge differentiating between an AV receiver and a stereo. While the former provides a complete surround system for the home theater, a stereo is useful for music only. Therefore, connecting to a stereo will not be a viable option if you are looking to watch movies and get the best quality sound while at it.
As we have mentioned, you can choose from different methods when connecting to an AV receiver. There is not much to the decision between the methods; your choice will mainly depend on the computer and receiver's available ports. Let us have a look at the most common methods you can use.
Use an Analog Cable
Using an analog cable is the easiest way to connect your computer to a receiver. Most computers come with a headphone jack that will come in handy here.
Using analog cables is one of the inexpensive methods of connecting to an AV receiver. Besides, you can find the cables at different lengths and even get extensions if you wish. Another advantage of analog cables is that they are versatile, and you can plug the headphone jack into just about any other device that can play music.
When choosing the ideal analog cable for your compute-receiver connection, you have four options:
Coaxial RF Cables
Although you can use these cables to send signals between different components, you should be prepared for the lowest quality video connection. These cables transmit video and stereo signals from the satellite dish, cable TV jack, or antenna and work best by carrying signals from outside the home to your AV receiver.
RCA Cables
Using RCA cables for PC-receiver connection is a popular choice for many people. RCA cables are also called phono connectors and carry both audio and video signals. You get to choose between dual and multi-channel cable connections:
Dual RCA Cables
A dual RCA connection transfers stereo audio signals. The pair comes as shielded cables bound together and usually have red and white plugs on both ends.
To connect using this method, you will need to connect your end of headphones to the jack on your laptop and the other to the RCA cable.
Connect the red and white plugs at the end of the cable to the ports in your receiver. To ensure the right connection, check that the plug and port colors match. Having the right connection will ensure the sound comes from the right direction.
Once you have everything set up, check the audio settings for the appropriate level. If you cannot hear any audio, set the headphones to default by clicking on the volume icon on the taskbar and selecting Playback.
Multichannel RCA Cables
This option involves six or more conductor cables and is ideal for transmitting more than five full-range audio channels and a couple of subwoofer channels.
Making a connection using multiple cables is similar to the dual method. You only need to ensure you match the ports with the plugs.
XLR Cables
An XLR cable comes with three pins and is an ideal alternative for unbalanced RCA connections. The three pins—one for the positive conductor, the other for the negative conductor, and the ground wire—all work together to deliver balanced audio.
Once you have connected your laptop to the receiver using an XLR cable, it cancels out the positive and negative conductors' noise, providing a greater dynamic range.
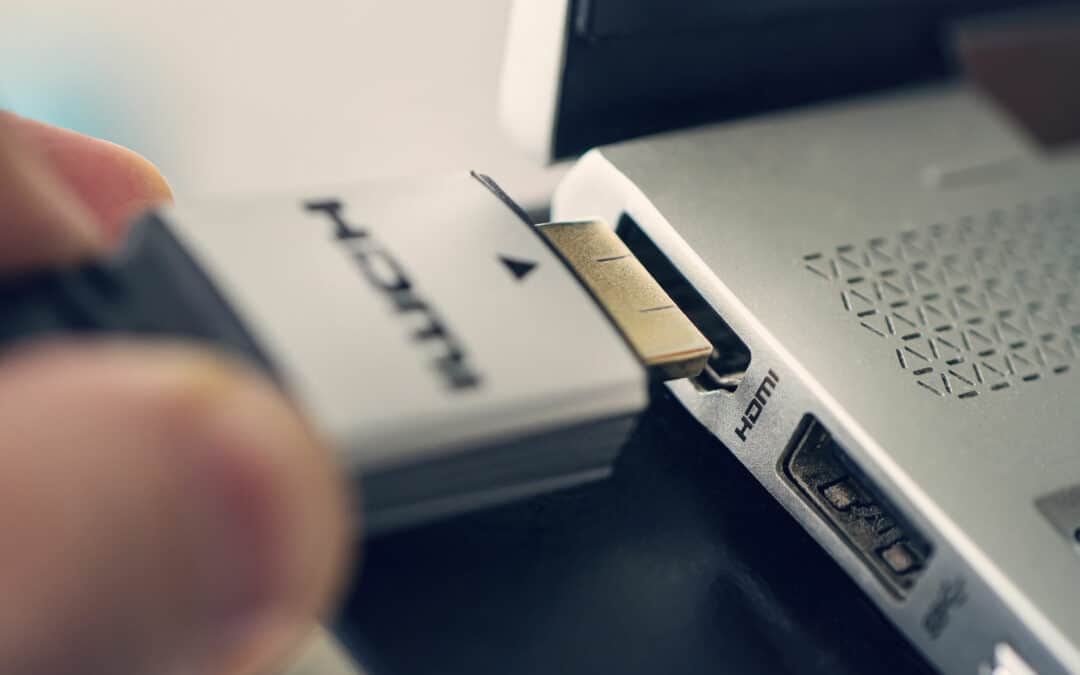
Use an HDMI Cable
HDMI stands for High-Definition Multimedia Interface and transmits both digital audio and video signals. As such, it is one of the most common ways of connecting laptops or computers to the surround system.
Using an HDMI cable should be your go-to alternative, especially if you are going after high-quality audio and video connections.
You will need to have HDMI ports on both your laptop and your receiver. Here are the steps you need to follow for a successful connection:
- Connect one end of your HDMI cable to your laptop/PC and the other to the 'HDMI in' port of your receiver.
- Navigate to the input settings and set the device as HDMI.
- On your Windows taskbar, right-click on the HDMI output and choose 'Playback Devices.' Here, you can make changes to the laptop's output audio as you wish.
- Right-click on the HDMI output option and set it as the default device. The exact name of the option will differ depending on the drivers and hardware components of your computer.
- Ensure you have chosen the right input channel on your receiver and the right output one on your laptop.
Using an HDMI cable to connect your computer to the surround system is the simplest and most convenient. You can even get cables of different lengths to make connections even easier.
Use a Toslink or SPDIF Cable
A Toslink cable is a digital audio connection cable developed by Toshiba and is similar to the SPDIF cable by Sony and Philips. It transmits audio signals as light pulses through a fiber optic cable. As is the case with other cables, making a connection is pretty straightforward, and you only need to follow these steps:
- Check if there are no wires or cables attached to the laptop. Also, ensure that the volume is turned to a minimum on your laptop and the surround sound system.
- Connect one end of the cable to your computer and the other to your receiver.
- Make sound changes in the settings on your laptop. Be sure to change the Windows default audio device by navigating to the control panel, select 'Sound,' right click on the optical output and set it to default.
Using a Toslink cable is advantageous because it does not use electrical currents. Therefore, you should not experience any electrical or magnetic interference.
Use a USB Cable
Some AV receivers come with a USB plug, which you can use to connect to your PC. If your receiver comes with a USB port, then it likely has an onboard DAC.
USB cables come with different types of connectors, so it is best to be familiar with the types so that you can pick the ideal one for your equipment. Usually, the receiver will feature a USB-B connector. Therefore, you will need to find a cable with a USB-A plug on one end and USB-B on the other.
When choosing the right USB cable, be sure to do some thorough research. A high-quality USB cable will reduce the timing errors that degrade the sound.
One thing worth noting is that you cannot connect your computer to the receiver using the connector on the front. Manufacturers designed the USB connector for hard drives and media players.
Use Your TV as a PC Monitor
Besides connecting your PC to the receiver directly, you can set up a connection through your TV. Using this method, you can even connect a surface tablet to your TV. You do not even have to worry about the display resolution and quality of images. Thanks to ultra-HD TVs, the quality will be quite similar to that of a PC.
Besides using HDMI (and DP on some TVs) to get high quality picture, there are two other ways for you to make the connection that allows you to use your TV as the PC monitor:
- With a Digital Visual Interface (DVI), you should get a clear picture since there is no digital to analog conversion. If you are using a DVI connection with your LCD TV, you will get clear images of high quality. This is the medium quality video option.
- If you have a Mac laptop or a desktop-like Mac Mini, you can use your TV as a PC monitor through a DVI connection. However, you will need an adapter so you can connect the mini DVI to the standard DVI. You should find this adapter in your package when you buy your computer.
- Most computers and laptops will come with a VGA port. If you are lucky enough, your LCD TV will allow you to connect to the computer using the VGA port directly. VGA connections are analog, and you should expect some picture distortions after connecting to your LCD TV. The video adapter converts the signal from the CPU to VGA and then sends it to a monitor with VGA input, which causes the distortions. This is the lowest quality video option.
All display ports can be connected with an adapter if your TV has different inputs than your computer can output. Alternatively, you can purchase cables that have different ends, negating the need for adapters in the first place.
Set Up a Phantom Monitor
Setting up a phantom monitor involves sending the video and audio signals independently, which allows you to receive high-quality sound and picture without one disrupting the other. This method sends the audio to the AV receiver and the video to the TV.
For you to set up a phantom monitor, your video card should have two HDMI ports, two DisplayPort outputs, or both. If you use a DisplayPort, you may have to get an adapter since most receivers and TVs have HDMI ports. Once you have the cords connected, you will need to tune your TV and receiver before you can start using the monitor.
Here are the next steps you should take to get everything working:
- On your desktop, navigate to 'Display Settings' and scroll down to 'Multiple Displays.'
- Head to the dropdown and click on 'Duplicate these Displays.'
- Alternatively, click on 'Detect' for the above option to appear if it is missing.
- Set up the surround sound on Windows 10 by right-clicking the sound icon in the system tray.
- Open the sound settings and navigate to the 'Sound Control Panel' under the 'Related Settings.'
- Ensure you have the output to your AV receiver as the default device.
- Configure the speakers by right-clicking on the audio output and testing the configuration.
When using a phantom monitor setup, you may have to configure everything again if you change the input to your AV receiver. Head to Multiple Monitors under Display Options and click on 'Detect,' which will prompt the PC to perform another HDMI handshake to set everything up and be ready to work.
Combining Stereo and Surround Sound in One AV Receiver
Usually, even if you have the best AV amplifier, there are high chances that it cannot match stereo amps' quality. You will probably have to decide which one, between the stereo and the surround sound, is more important to you and sacrifice the other for better performance.
However, you can set up the systems to meet in the middle and not compromise. For this, you are going to need an amplifier for the surround sound and another for the stereo. The surround sound's amplifier should have pre-outs for both front speakers that output an analog signal to the stereo amp.
You can use just about any stereo amp with the standard RCA inputs to set up this system. However, suppose you are going for high-quality sound and video. In that case, you are better off choosing a stereo receiver that has a dedicated input so that it bypasses its volume control and other equalizer functions.
This functionality gives the receiver complete control over the volume and sonic character. By getting rid of any extra volume controls, you are able to minimize distortion.
If you are using a receiver without a dedicated AV input, ensure that you set the volume control at the same level as that of the surround amp when using them simultaneously.
You are also going to need some speakers, preferably front-left and front-right speakers that come with HiFi properties.
Once you have everything you need, here are the steps you should follow to set up your system:
- Plug the speakers. The front right and front left speakers should go to the stereo receiver while all the others are plugged into the AV amp's corresponding terminals. You should then connect the front left and front right pre-outs of the AV receiver to the stereo receiver's AV input.
- Calibrate the speakers. To do this, you will need to specify the speaker configuration that you are using. Most high-end AV receivers will have an 'amp assign' option that you can use to notify the receiver that you are using an external amp for the front two speakers.
- Start the automatic speaker calibration. You can run this as you would normally do to check that all speakers are running as they should. If you get any error messages, you may have made a mistake in the amp assignment or during the wiring.
- Connect all video sources to the AV amplifier and the two-channel music sources to the stereo. If all the connections are right and you have configured everything correctly, you should be able to get a balanced surround sound, just as you would if you connected everything directly to the receiver.
Connecting Your PC to the Home Theater Wirelessly
Let's face it; having cables running all around your living room is not a pleasant sight. Besides, they are a safety hazard, especially if you have kids and pets in the house with you. Seeing as the AV receiver is the center of the home entertainment system, you just cannot do without it if you want some high-quality video and audio signals.
There are options to hide your cables and keep them neatly managed, but what about wireless connection options?
Wireless Video Adapters
Most modern PCs come with wireless cards and Bluetooth adapters to make the wireless connection even easier. If this is not the case for your computer, you will need a wireless video adapter for the connection.
Wireless video adapters are available in different shapes, sizes and offer different connectivity. When connecting your computer to the TV, the adapter uses the same ports as you would if using a cable to connect. The adapter kit comes with both a receiver and a transmitter. Your computer will connect to the wireless transmitter while the display connects to the receiver.
Screen Mirroring
Other options to connect your PC to the home theater wirelessly include screen mirroring and extending. Mirroring allows you to have the same content on your laptop and TV screen. Although you can still use an HDMI wired connection for this, you also have some wireless options.
For example, if you are using an Apple computer, you only need a device that supports Airplay, such as Apple TV or Apple TV 4K. The Miracast feature is the Windows PC counterpart, and you will require devices that support it, including Roku streamers and wireless display adapters.
You can also connect your computer wirelessly to the TV if it runs Google's Chrome OS. You'll need Chromecast, Chromecast Ultra, Nvidia Shield, and Sony TVs that run Android TV to use this feature.
Screen Extending
Extending is not as common as mirroring, and it allows you to display different content on both screens. In this way, the TV acts as an extension of your PC's screen. This method is particularly useful if you would like YouTube to play as you work on something else on your laptop.
One of the most significant downsides to wireless connections is that they often experience lag. Therefore, if you intend to do something that requires fast responses, such as gaming, you may want to explore the wired connections we discussed above.
Desktop Streaming
There are set top boxes, like the Steam Link, that can allow you to locally broadcast the video out, or what the monitor sees to your streaming box. This allows your computer to be in an entirely different room and still enjoy a relatively snappy response time in playing games.
Common Mistakes When Setting Up a Home Theater System
You have finally configured what goes where and you are ready to power your home theater system. However, something seems to be amiss, and the quality of your sound and pictures are just not right. You have probably taken a wrong turn somewhere, but you can't seem to pinpoint where.
Well, here are some of the common mistakes you should avoid when setting up your home theater system:
Choosing the Components in the Wrong Order
Sure, the receiver is often the hub of most home theater systems. However, when setting up your system, be sure not to buy the receiver as the first component. Ideally, choose your speakers first, bearing the room and your budget in mind. You can then buy the receiver to match the speakers.
If you are buying a home theater system, the screen and video display should be your first choice before getting speakers that complement everything.
Disregarding the Room Acoustics
Most people do not realize how much a room's acoustics affect the sound from your home theater system. If your sound is not very appealing, you do not have to change the speakers immediately. Figure out how the room surrounding is affecting your entertainment. You may be shocked that a little tweaking in the room can save you several bucks.
For example, hardwood floors and other hard surfaces will result in poor sound quality, thanks to increased sound reflection. To reduce the reflection rate, install some acoustic panels right next to the right and left speakers, but even without these panels, you can easily alter your room acoustics by adding a floor rug and curtains.
To help you determine whether you need to work on a room's acoustics, carry out the THX clap test and check what areas you can improve.
Placing Objects in Front of the Speaker
Most people have different items placed in front of their speakers. If you are one such person, you may want to move it to better the speakers' clarity and quality of sound. Having several objects around the speakers provides more surface for reflection. When the reflected sound mixes with the speakers' direct sound, the result is reduced focus and clarity.
Visual Distractions in the Theater Room
Just the way room acoustics affect the sound from your home theater, you may also get visual distractions due to having the wrong room colors, improper lighting, and several reflective surfaces in your home theater.
When it comes to selecting colors for your entertainment room's ceiling and walls, stir off the light hues. Wall hangings or curtains should also be in darker shades. Light colors are not very ideal because of the reflection they are likely to cause on the theater screen. Also, during bright sections of the movie airing, the room will light up.
If your mistake is having shiny gadgets in the entertainment room, then simply move these electronics so that their reflection does not appear on the video display. In case there is a window directly facing the display screen, then cover that up with a dark-colored curtain.
Improper Calibration
One of the most common mistakes most people make is calibrating the bass wrongly. Most people will have the bass level too loud by up to 10 and 12db.
When calibrating your system, take your time to ensure you get everything right. Internal test tones work excellently as a minimum to help balance all your channels. Check that all the components, including your subwoofer, are correctly set to reduce sound bloating.
Not Using HDMI
Although there are several ways of setting up your home theater system, using HDMI is the best option. An HDMI cable is the best method of moving digital signals from one system component to another. Although this option is mainly beneficial to the video quality, it also plays a small role in your system's quality of sound.
Parting Shot
Connecting your laptop or PC to the AV receiver is not rocket science. You only need to understand what goes where and you can quickly configure everything. The hardest part is figuring out exactly what to use to get the quality you desiree. If you are stuck on a certain step, the manuals should be of great assistance.
The best thing is that you have different options to choose from when determining the connection's best method. However, you are better off with an HDMI wired connection if you are after high-quality sound and video. Additionally, you can connect everything wirelessly to reduce the number of wires running around in your living room.